What to Expect When Commissioning the Building Enclosure
A project-based retrospect on lessons learned from implementing successful commissioning of building enclosures.
Back in the third quarter edition of this publication from earlier this year, my friend Gary Williams did a fantastic job describing the Building Enclosure Commissioning (BECx) process and its benefits. I want to dovetail into his detailed process description to drive home the value of BECx, tell the story of a few projects and our experience implementing BECx, and also share some lessons learned we think are helpful for owners, consultants, and providers of BECx to understand. Gary’s article might be a good precursory read prior to diving into the information below. You can find it at www.chamberlinltd.com by searching “BECx Gary Williams”.
Lesson #1: Inspect the mock-up for low hanging fruit.
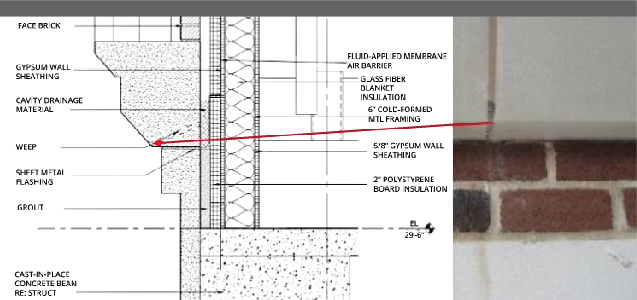
Most of us are used to looking at section views of plans and have learned how to recognize the detail in the section view as it translates into a completed system. Rarely do we get the opportunity to see a real section view in construction, except when the construction team is required to provide mock-ups of the building enclosure system. Mock-ups give the BECx provider a great head start reviewing how the contractors are actually going to install the enclosure system and also how that system will likely perform when completed. In figure 1, we see discoloration on the face of the stone due to the actual position of the weep being shallower than the designed position. Moisture was running down the brick face and onto the stone instead of dripping past the brick and falling to the ground. Correcting the installation mistake during mock-up was much less costly to the contractor and saved the owner years of operational headaches cleaning stone.
 Plan section view versus actual installation
Lesson #2: Expect the unexpected; the design may need to change to accommodate reality.
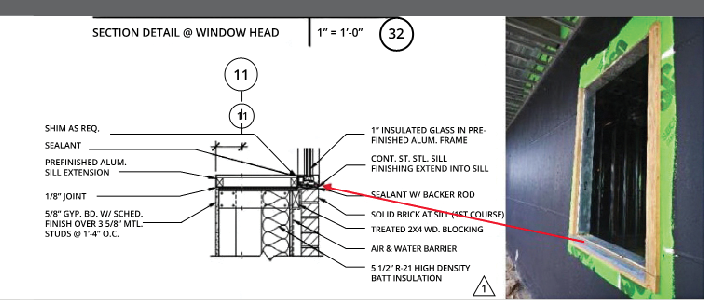
Variations in product dimensions due to availability, substitutions, or mistakes are common in construction and affect every trade. Where there is some flexibility in dimensions with HVAC, electrical, or plumbing systems that are covered up in walls, there is little flexibility with the building enclosure, because so much of the waterproofing’s effectiveness relies on dimensions. Case in point is a project where we encountered a potential waterproofing issue with the windows. Due to a product substitution approved by the designer, the windows in a large K-12 project were no longer going to be flush to the brick. This required a field alteration to the design of the sill and wall-applied air and water barrier detail. In figure 2, we can see a galvanized sill installed at the base of the window opening that interferes with the designed continuous air and water barrier. At this point in the project, the substituted windows were ordered and the field alteration had occurred at all of the more than 50 window locations. Sticking with the original design would have been costly and time consuming. The contractor, designer, owner, and BECx provider worked together to come up with a solution and revised the design to incorporate the air and water barrier wrapping over the sill. This correction was incorporated into the project with no lost time or add in cost because the team understood sometimes the design needs to change to accommodate reality.
 Plan section view versus actual installation
Lesson #3: Scheduling is critical because BECx can get messy.
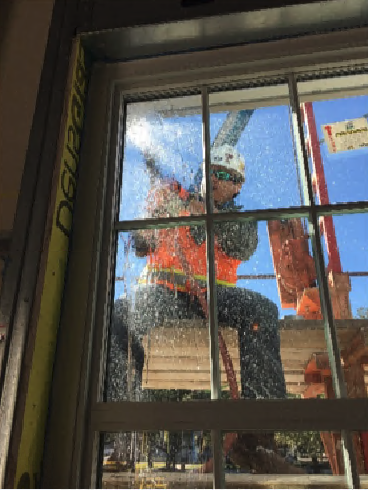
I think the best lesson we ever learned implementing BECx is how important advocating for sequence and duration in project scheduling is for the project wellbeing and sanity of the team. BECx is becoming more popular in the industry, but is still less understood than general building commissioning. Construction teams, owners, and consultants need help from the BECx provider to get the right sequence of events and durations into the project schedule but, they themselves may not understand the process well enough to get it right. For example, AAMA 501.2 testing of finished window enclosures requires the BECx provider to shoot pressurized water at the windows while being able to detect small leaks inside of the enclosure. Figure 3 shows an intrepid BECx provider hoisted above a window enclosure for water intrusion testing. The coordination effort to ensure the exterior of the window was installed well in advance of the interior finish-out was imperative so the water intrusion testing could occur without damaging finishes. Coordination with the landscaping contractor was also important so the scaffolding and water didn’t damage finished landscaping. This coordination occurred during pre-testing meetings well in advance of actual testing and included all of the project stakeholders involved to make sure the goals and consequences of the water intrusion testing were understood and precautions were incorporated to minimize damage to finished surfaces and project delays due to repair.
 AAMA 501.2 Testing
To get the most bang for your BECx buck, make sure to include inspection of the enclosure mock-ups to find and correct issues early in the project, be prepared to make changes to the design to accommodate reality, and insist on tight sequence and duration scheduling involving all of the project stakeholders. If you can focus your time into these three lessons learned, you will help maximize some of the benefits of BECx which are better quality of the installed product, finding and correcting issues before they become a large impact on cost or time, and helping the team work together to turn over a finished project to the owner.

By Tony Casagrande, PE
President and Principal
Campos Engineering
Subscribe Today!
Stay-in-the-know and subscribe to our blog today!